


Before unscrewing: understand if your notebook accepts upgrades
Upgrading RAM in an old notebook is one of the cheapest and most effective ways to get extra performance without buying a new machine. A notebook that freezes when opening the browser with ten tabs, or that takes time to switch between programs, is almost always suffering from lack of memory. The process is simple, but requires attention before putting a hand on the tools.
The first step, and the most overlooked, is to confirm whether your model allows the upgrade. Notebooks launched until around 2022 usually have physical and accessible SODIMM memory slots. From then on, many manufacturers started soldering RAM directly to the motherboard, a standard called onboard memory. If your RAM is onboard, there’s nothing you can do: no upgrade is possible.
This tutorial is for those who have a notebook with removable memory, want to increase capacity or replace old modules with faster ones, and don’t want to pay a lot for it. See what you’ll need and how to do it safely.
What you need before you start
Basic requirements:
- Notebook with accessible SODIMM slots (confirm in the manual or on the manufacturer’s website)
- Small Phillips screwdriver (usually PH0 or PH00)
- Anti-static wrist strap or non-conductive surface to work on
- RAM modules compatible with your model
About the operating system: the tutorial works for both Windows 10, Windows 11 and popular Linux distributions. The physical procedure is the same; only the verification steps within the system vary.
Step 1: Find out what type and amount of RAM your notebook supports
Opening the notebook without knowing what to buy is wasted time. You need three pieces of information: the type of memory (DDR3, DDR4 or DDR5), the frequency in MHz and the maximum amount of GB that the motherboard supports.
- On Windows, press
Win + R, typemsinfo32and press Enter. On the System Information screen, find “Installed physical memory” to see how much you have now. - For more details on type and frequency, download the CPU-Z program (free, available on CPUID’s official website). In the “Memory” tab, you can see the type and real speed operating.
- Consult the notebook manual or the manufacturer’s support page (Dell, HP, Lenovo, Asus, etc.) to find out the maximum number of GBs supported and how many physical slots exist. This information is critical: a notebook may have two slots but support a maximum of 16 GB, for example.
If you can’t find the manual, the Crucial website has a search tool by model that indicates compatible modules. Use this as a reference, but compare with the manufacturer’s official specifications before buying.
Step 2: Choose the right RAM modules
SODIMM is the standard format for notebooks. Don’t confuse it with DIMM, which is the desktop format.
- DDR3: present in machines released between 2007 and 2015, approximately. Common frequencies: 1333 MHz and 1600 MHz.
- DDR4: dominant standard in notebooks from 2016 to 2023. Common frequencies: 2400 MHz, 2666 MHz and 3200 MHz.
- DDR5: present in newer models, with frequencies starting at 4800 MHz. If your notebook uses DDR5 and still allows upgrading, check the data sheet for the supported frequency.
An important point: RAM with a higher frequency than supported by the motherboard will work, but will operate at the system’s maximum speed, not at the module’s speed. You don’t lose anything, but you don’t gain either.
How much to buy? For general use with Windows 11 and Chrome, 16 GB is the comfortable minimum in 2026. If the notebook only has 4 GB now, the jump to 8 GB already relieves a lot; from 8 GB to 16 GB, the difference is noticeable in multitasking. For video editing or virtual machine use, 32 GB makes sense if the motherboard supports it.
Prices in Brazil: DDR4 SODIMM 8 GB modules range from R$ 80 to R$ 150, depending on brand and frequency. A 16 GB kit (2×8 GB) ranges from R$ 160 to R$ 280. DDR5 modules are still more expensive, usually over R$ 200 per 8 GB. These values vary depending on exchange rate, store and promotions.
Brands with good availability in Brazil include Kingston, Crucial, Corsair and G.Skill. Check if the product has national warranty and invoice; imported memory without local warranty can become a headache.
Step 3: Open the notebook safely
- Turn off the notebook completely. Don’t use sleep or hibernation mode.
- Disconnect the charger and all cables.
- If possible, wear an anti-static wrist strap attached to your wrist and connected to a grounded metal surface. If you don’t have one, touch a non-painted metal surface before touching components.
- Turn the notebook over and remove the screws from the back cover. Store them in a small container so you don’t lose them.
- Open the cover carefully. Some models use plastic clips in addition to screws; use a plastic spatula or an old card to loosen the edges without forcing.
- Locate the RAM slots. They usually become visible as soon as the cover opens, sometimes covered by a protective film.
Step 4: Remove old modules and install new ones
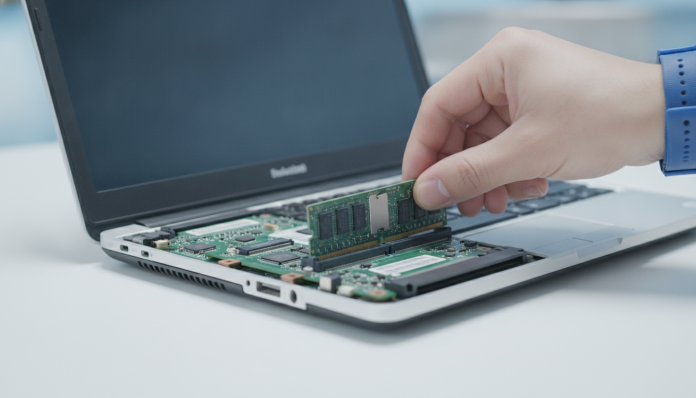
- To remove an existing module, push the side latches of the slot outward simultaneously. The memory will rise at approximately 30 degrees.
- Pull the module at an angle, without forcing. It comes out smoothly.
- Hold the new module by the edges, without touching the gold contacts.
- Align the module’s slot with the connector: there is a notch in the row of contacts that indicates the correct position. If it doesn’t fit smoothly, don’t force it.
- Push the module down until you hear the side latches click. It should be flat and firm.
- Repeat for the second slot, if installing two modules.
If you’re installing two modules, prefer a matched kit (two identical modules from the same manufacturer and batch). This activates dual channel mode, where the two modules work in parallel, increasing memory bandwidth. The performance improvement in tasks requiring a lot of memory reading and writing is real and documented by manufacturers.
Step 5: Close the notebook and verify
- Replace the back cover and screws. Don’t tighten too much; plastic screws break easily.
- Connect the charger and turn on the notebook.
- If a black screen or POST warning appears (BIOS message when starting), don’t be alarmed. Sometimes the system detects hardware changes and takes a bit longer on the first boot.
- On Windows, go to
Settings > System > Aboutand confirm the amount of RAM detected. - In CPU-Z, verify that the frequency is correct and that dual channel has been activated (appears as “Dual” in the Memory tab).
If the machine doesn’t turn on or shows errors, turn it off, open it again and check that the modules are properly seated. A poorly inserted click is the most common cause of problems at this stage.
Common problems and how to solve them
Notebook won’t turn on after upgrade: Almost always it’s a poorly seated module. Remove it, inspect the contacts and reinstall it firmly. If the problem persists, test with only one module at a time to identify if one of them is defective.
RAM appears in a smaller amount than installed: Check the notebook manufacturer’s website for per-slot or total limits. It could also be a BIOS configuration: in some models, memory needs to be enabled via XMP/DOCP option in BIOS to operate at the correct frequency.
Notebook accepts new RAM but frequently freezes: It could be incompatibility between the module and the motherboard, even if the type is the same. Run the MemTest86 program (free, bootable via USB drive) to test memory integrity over a few hours. If it shows errors, the module may be defective or incompatible.
System recognizes less memory than physically installed: On Windows, go to Settings > System > About > Advanced system settings > Performance > Settings > Advanced and check if there’s an active memory restriction in the virtual memory section. In some rare cases, a BIOS configuration limits visible RAM.
Frequently asked questions about RAM upgrade in notebooks
How do I know if my notebook’s RAM is soldered or removable?
Check the manufacturer’s support page or search for the model number followed by “specs” or “technical specifications”. The “memory” field will indicate if it’s SODIMM (removable) or if it’s listed as “onboard” or “soldered”. Another way is to open the notebook and observe: if there’s a slot with metal clips on the sides, the memory is removable.
Can I mix modules from different brands?
Technically it works, as long as the type (DDR4, for example) and frequency are the same. The system will operate at the speed of the slower module. However, modules from different brands and batches may cause instability in some systems. Whenever possible, use a matched kit from the same brand.
Does upgrading RAM void the notebook’s warranty?
It depends on the manufacturer and warranty agreement. Some manufacturers, like Dell on certain corporate models, explicitly allow users to replace RAM. Others treat any opening as warranty cancellation. Read the terms before opening. If the notebook is still under warranty and you want to upgrade, take it to an authorized service center.
What’s the difference between RAM and SSD upgrades? Which to do first?
If the notebook still uses an HD, replacing it with an SSD tends to have a more noticeable impact on daily use: boot time and program opening drop drastically. If it already has an SSD but little RAM, the memory upgrade solves freezing and slowdown in multitasking. Ideally, of course, you’d have both. If you can only budget for one, evaluate which is the bottleneck: if the notebook takes time to start, focus on the SSD; if it freezes with multiple programs open, focus on RAM.
Is the upgrade worth it in 2026?
For notebooks 4 to 8 years old with still-functional hardware, the answer is almost always yes. The cost of a pair of DDR4 8 GB modules rarely exceeds R$ 200, and the result can be a machine that will respond well again for everyday tasks. Before considering a new notebook, it’s worth investigating whether a RAM upgrade and an SSD would solve the problem.
If you’re planning to buy a new notebook and are evaluating options with a focus on durability and energy efficiency, it’s worth reading the article on notebook with long battery: how to choose without mistakes to understand which specifications to look at before closing the order.
The upgrade is not for those with soldered RAM notebooks, for those who need a graphics performance boost (memory doesn’t help with that) or for those who already have 16 GB and want more processing speed. In these cases, the bottleneck is in another component, and the money is better invested elsewhere.